Credit: Hillary H. Credit: Hillary H.

Credit: Hillary H. Credit: Hillary H.

Credit: Hillary H. Credit: Hillary H.

Credit: Hillary H. Credit: Hillary H.


Credit: Hillary H. Credit: Hillary H.

Credit: Hillary H. Credit: Hillary H.


Credit: Hillary H. Credit: Hillary H.
This article may contain affiliate links that Yahoo and/or the publisher may receive a commission from if you buy a product or service through those links.
ABOUT THIS BEFORE & AFTER
HOME TYPE: Apartment
PROJECT TYPE: Kitchen
STYLE: Scandinavian
SKILL LEVEL: Professional
RENTAL FRIENDLY: No
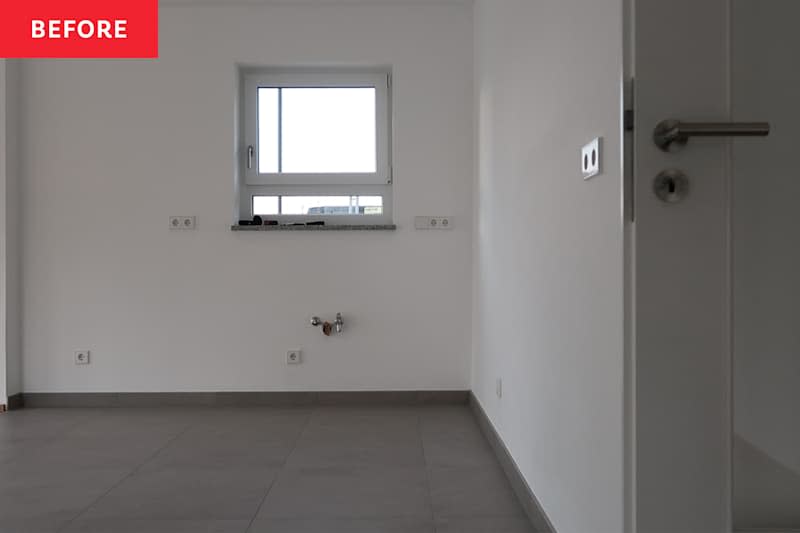
When you hear that a kitchen is a “blank space,” you probably assume that it’s minimally furnished but still has the basics (cabinets, counters, appliances). But in some areas, “blank space” means, quite literally, blank space. In Germany, for instance, it’s common for rental units to come without a kitchen — meaning the renter who’s moving in literally has to build their own from scratch, or pay extra to keep the previous renter’s kitchen for themselves.
Advertisement
Advertisement
When DIYer Hillary and her husband, Pat, moved into their apartment, they found themselves in just that scenario. The space where the kitchen would be was totally empty, meaning they’d have to create their own. “Since our apartment is a new build, we did not have the choice to buy [an existing kitchen], but were happy to be able to fully customize our kitchen to our needs,” Hillary says. That said, she knew she wanted to make sure that the project cost them less than $10,000€ total, including the appliances.
With a hard budget in mind, the couple scouted out options before ultimately landing on IKEA, which Hillary says was “the most affordable and we liked the finishing options since our style leans Scandinavian.”


Planning the design was a major part of the reno.
Hillary used IKEA’s layout tools to map out her ideas for her dream kitchen before discussing with a kitchen designer at the store. She recommends the same for anyone else who’s planning to buy an IKEA kitchen — and says you should come with questions, too. The designer helped Hillary and Pat trim costs throughout their space by cutting out any unnecessary upgrades and suggesting that the couple build the island — which wouldn’t need to be plumbed or wired — themselves.


Oak veneer cabinets warm up the space.
Hillary and Pat weren’t fans of the gray tiled floors, which Hillary says made the space feel cold. To warm it up, the couple went with oak veneer cabinets topped with marble countertops. The new appliances are also from IKEA; the range hood, which has a vintage vibe, is a favorite statement piece.
Advertisement
Advertisement
Pros installed the lower cabinets (and countertops and appliances), but Hillary and Pat decided to skip out on buying uppers. Instead, they installed their own floating shelves — something Hillary says was surprisingly easy and took less than an hour in total. The shelves themselves were made by a local woodworker.


A DIY island adds even more storage.
Another thing Hillary and Pat DIYed themselves? The island, which also came from IKEA. Choosing to do that project on their own saved them about $1,000€ in labor costs. Unfortunately, it wasn’t quite as easy as the floating shelves. “Building the island was the hardest part,” Hillary says. “We were surprised how there were pieces that we had to cut on our own and it wouldn’t have been possible without a power saw. The IKEA manual shows that a regular saw is possible, but it would have taken literally hours to cut manually.”


Peel-and-stick tiles bring a little color.
Hillary found her peel-and-stick tiles while visiting family in Singapore, and knew they were the perfect way to bring a little color to the kitchen. However, she was hesitant to apply them straight to the wall in case they caused damage on removal — they do live in a rental, after all!
Hillary came up with an ingenious plan that helped minimize any repairs the couple would need to do later. “I’m really proud of how I came up with the idea to install a MDF backing for the tiles to stick on,” she says. “The MDF backing is installed with a nail gun and super easy to remove and patch if we ever moved out.”
Advertisement
Advertisement
More in Lifestyle
Now, the kitchen is anything but a blank space. “The oak veneer cabinets, subtle marbled countertop, and vertically stacked blue tiles work really well together to create a warm and inviting kitchen!” Hillary says. “We’re also happy with our decision to not add upper cabinets but opt for floating shelves instead, as it keeps the space open and bright.”
And best part? Hillary and Pat came in well under their initial budget; they spent 6,700€ (approximately $7,048 USD) in total. “I’m proud of myself for designing the IKEA kitchen the way I did, from the placement of each cabinet and also choosing when to use drawers versus cupboards,” Hillary says. “Everything is easily organized and just makes sense — which is really important for a kitchen!
Inspired? Submit your own project here.
Further Reading
We Tested (and Rated!) Every Sofa at West Elm — Here Are the Best for Every Type of Need
We Asked 8 Pro Travelers What They Never Pack in Their Carry-On, and Here’s What They Said
EMEA Tribune is not involved in this news article, it is taken from our partners and or from the News Agencies. Copyright and Credit go to the News Agencies, email news@emeatribune.com Follow our WhatsApp verified Channel


